Tuesday, November 27, 2012

All About Me Blog Hop


Welcome to the all about me blog hop!
This is my first time hosting a hop so hopefully it will go smoothly for all of you!
I have a nice Blog Candy Package that you will see listed at the bottom of the post.
You will need to Leave a comment on each blog  along the way and become a follower to be able
to have a chance at the random drawing for the blog candy. It is packaged up and ready for a happy crafty home!!!
O.k here is the pic of my project:


After alot of thought about what is really important to me and what I love the most about my life
It is and always will be my Daughter and my 2 grand daughters. They are my heart.
Beautiful papers, flowers,buttons...... I could just go on and on. Paper Crafting is my joy.
It is also my way to relax after a rough day at work or just to snuggle in on a day off. I can entertain myself for hours. 
The pink back round paper is Bo Bunny double dot. The flowers are prima. The Heart die cut paper I have had forever. The 3 beautiful straight pins in the layout and cute covered buttons are made by my friends at
photobucket

You will have to go and check out the beautiful items they are making and selling to help us along in our paper crafting addiction.
All the cute little head bands and bows are made by my daughter so check out her facebook page. She also does custom ones in military camo, and any combo you can think of and here is her facebook badge
Now here is a pic of all the yummy blog candy:)
Remember the drawing will be random and done with Random.Org
You will need to comment and become a follower on every blog in the hop.
You won't want to miss any of the wonderful projects the ladies have come up with.I am honored to have each and everyone of them in my hop!!! Here is the line up! Happy Hopping:))
The winner will be posted Friday the 30th by 3PM PST be sure to include contact info in your comment.


1.  Shelley  - http://shelley-scrapbookingforfun.blogspot.com/

2.  Judy - www.bepresentbereal.blogspot.com/

3.  Sandy - http://scrapbookblessings.blogspot.com/

4.  Shelley T - http://heartstring-designs.blogspot.com/

5.  Melissa - http://iamapapermaniac.blogspot.com/

6.  Janet - http://janetscreativeworld.blogspot.com/

7.  Roberta  - http://thepapercraftingleague.blogspot.com/

8.  Claire - http://threewaterscreations.blogspot.com/

9.  Sarah -  http://craftingwithsarah.blogspot.com/

10. Cathy - http://cathyplus5.blogspot.com/

11. Nadja - http://nadjarobbins.blogspot.com/

12. Tess - www.sassycricutcrafting.com/

13. Robin  - http://cutonedesignsbyrobin.blogspot.com/

14. Amy - http://www.scrapthissavethat.blogspot.com/

15. Miranda- http://www.nanasscrapspot.com/

16. Kim - http://theartisansattic.blogspot.com/


Monday, November 19, 2012

Card Creating Tuesday with My Cricut Craft Room

Welcome!!! as always I am starting with a screen shot of my  project designed in My Cricut Craftroom!
If you haven.'t tried it with the improvements you are missing out on a awesome free tool!! I would be lost without it!!!
I used Autumn Celebrations and Imagine Cartridge Enjoy the Seasons
Now on to my project


This is as you can see is yes a Thanksgiving card. I started with a chocolate base card stock then used a bobunny doubledot paper. I cut the turkey at 3 inches and all the other cuts were done at 2.00 inches. I used Stickles glitter glue and Pure Glitz Tiara on the give thanks. I am not only a crazy about cricut girl but I love my bling!!!


I know this is a short and sweet project but Cricut made this one easy especially mt Imagine which I love!!!
Be sure to go back to 

http://mycricutcraftroom.blogspot.com/

to see all the great projects from my Design Team Sisters. We have new talent and you don't want to miss a single post!!!!

Tuesday, November 13, 2012

Welcome to My Cricut Craftrooms WYEGW


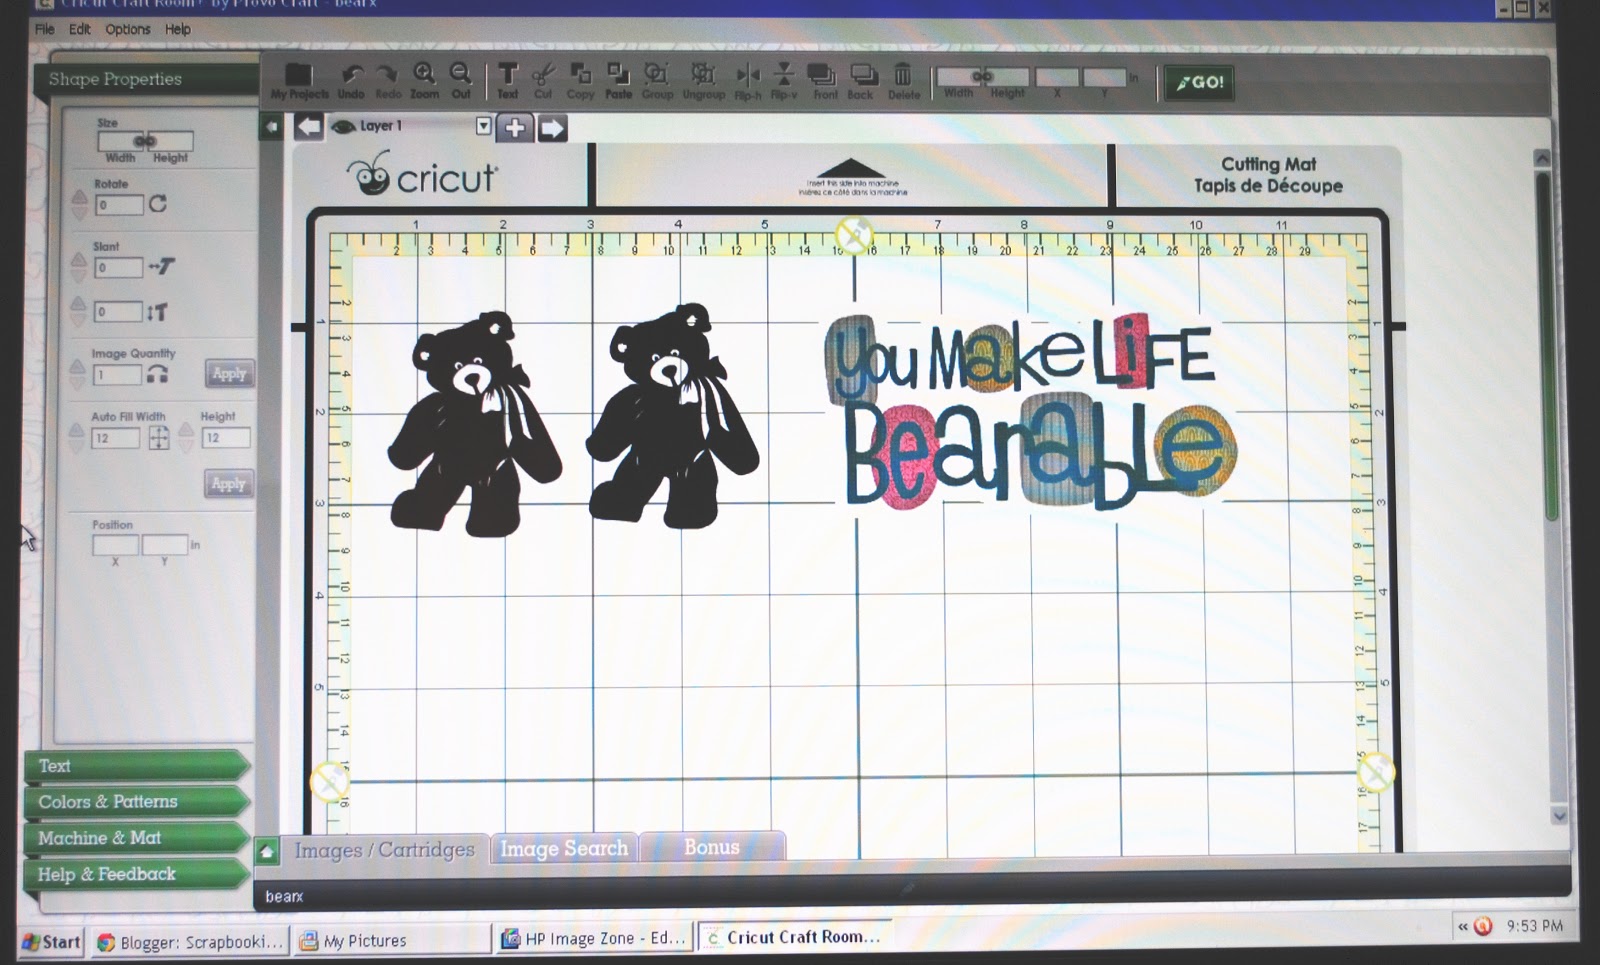
Hello everyone this one was a little tough for me. I had to use a bear that was not a main feature from the cartridges. So I used the button feature from a Child's life to make my Bears. I then used Better together for the tag at the top. First I will show you my design with a screen shot from My Cricut Craft Room which is where I design all of my projects.
This is the best design program around I love it!!!
Now here is my finished project


Because the bears were a button feature you can't layer them so I pulled out my handy dandy stickles to give them features. They are cut at 2 inches I used a cuttlebug embossing folder of snowflakes and embossed the white back round then took a gold ink pad I lightly rubbed over the up raised snow flakes. The bow is 2 colors of twine twisted together and tied at an angle The title cut is from Better Together which is an Imagine Cartridge and is cut at 2.75 inches. I did use stickles on 2 of the snow flakes to match the bows on the bears.
Be sure to go back to My Cricut Craft Room 
to see all of the great projects from My Wonderful Design Team Sisters and leave them a little blog love:))
For all things Cricut and more visit:

My Cricut Craft Room


Hi everyone !!! This is a little show case of what Heathers hop on Dec 23rd and 24th will have to offer!
She has blog candy for those that hop through this mini hop and leave blog love:))

Here is my project for this little mini show case!!!!


The Tree is a cricut cut and the owls and other decor are cute little felt stickers!!!
I have a whole new owl project for her big December hop with more detail!!!
Thank-you for looking!
Head back to Heathers blog to see who you need to visit next:)))
http://heathernovinger.blogspot.com/2012/11/owl-made-by-my-friends-showcase-giveaway.html

Sunday, November 4, 2012

Welcome to another Imagination Monday!!

Today I used Imagine Cartridge Enjoy the Seasons.
Here is a screen shot of my design in Craft room


Here is the finished project. I did go in and do the tag in layers as you can see in the screen shot because I wanted to use a different pattern on the base of the tag. The tag is cut at 3.50 inches.
The birds are cut at 3 inches and in order to have 2 of them facing each other I used the flip feature in craft room to make that happen . I used rouge stickles on the berries to make them pop and stardust stickles on the birds. I also used chocolate stickles on the tree trunks and branches to give them texture. In order for the birds to show up I used a chipboard round coaster and used a lighter patterned paper to cover it. The paper I used is Bobunny and I think it was from 2 years ago. So far it is still my fav paper for 
Christmas cards.

Thank-you for stopping by and I love to hear from you! Be sure to go back to
To see great projects from my design team sisters!!!

Friday, November 2, 2012

100 Cartridge Blog Hop with My Cricut Craft Room

Welcome to Erica's Craft Room
100 Cricut Cartridge Blog Hop Day ONE


You should have started at http://mycricutcraftroom.blogspot.com/ if not please start at the beginning


If you came from Miranda's Blog then  you are right on track!!!
I have made a few projects for you today!!

Here is my First Project. On this layout I used  Imagine Cartridge Santa's Village and Dec 25th
 Santa in the sleigh is from Santa's village and was cut at 3 inches. The reindeer is from the same cartridge and was cut at 1.50 inches. The Merry Christmas cut was done at 1.25 and is from the Dec 25th Cartridge.
The gold sparkle I added using gold Stickles.

Here is my 2 nd project and on this one I used Santa's Village and Rock Princess
 I started this one by embossing the white card stock with a snow flake Cuttle Bug Folder and tying on the gold ribbon before I attached it to the Red 1/2 fold card. Santa is cut at 3 inches and the cut is from the Imagine Cartridge Santa's Village. The guitar is a cut from Rock Princess and was cut at 2.50 inches. The Jingle bell rock was cut at .50 and is the Heart lettering option on Rock Princess. The cut that the letters are on is also from Rock Princess. When I attached Mr Claus I used a wobbler so that every time he is moved he dances. I wish I could show that here but can't so you will just have to picture him Rocking out :)

Here is my last project.
On this one I used Teddy Bear Parade, Imagine Cartridge Santa's Village, and Imagine cartridge
Word of Mouth

The Believe in the magic tag is from Word of Mouth and is cut at 1.50 inches.
The Christmas Tree is from Santa's Village and is cut at 3.00 inches. The cute teddy bear is from
 Teddy Bear Parade. The images on this cartridge are so cute and there is several for holidays. I chose to use the reindeer.I used every layer feature on this little guy and he is cut at 2.50 inches
The card base is a standard White card stock then I added the snowflake paper and the big bold red and white bow.  I use Craftroom to design all of my projects. After the latest update it has worked so well with my Imagine I love it. Most of my projects are made using my Imagine machine I love being able to design in craftroom and use the colors and patterns available on the Imagine cartridges.  From now on I will take a pic of the craftroom screen so you can see all of the layers laid out. Well that is all I have for you today!! Your next stop should be Lisa's Blog
Here is the full line up in case you get lost along the way:)

MCCR http://mycricutcraftroom.blogspot.com
Kathy S http://3spoileddogs.blogspot.com
Mary http://Mary-fortheloveofart.blogspot.com
Nadja http://nadjarobbins.blogspot.com

Miranda http://www.nanasscrapspot.com
Shelley http://shelley-scrapbookingforfun.blogspot.com
Lisa Chamberlain http://lisacustomscrapbooking.blogspot.com
Janet http://janetscreativeworld.blogspot.com
Lisa Carrier http://ourcraftingcorner.blogspot.com
Sharon http://www.simplysweetbysharon.blogspot.com
Tammy S http://www.Cuttinandstampin.blogspot.com
Jessica S http://jessicascraftshaque.blogspot.com
Erica’s Blog Candy http://ericasblogcandy.blogspot.com 


Monday, October 29, 2012

Welcome to Card Creating Tuesday With My Cricut Craft Room


Hi everyone! This week was an easy one. We had the choice of making any card we chose
so I made my Mom's Birthday Card. She is a animal and nature lover  so it was easy!!
I used Imagine Cartridge Enjoy the Seasons and Close to my heart Artiste to make this card.
Below you will see the screen shot in craft room which is where I almost always create my projects and here is the great thing It is a free program through Cricut Craft Room by Provo Craft!!!

Here is the completed card

Now I started with Enjoy the Seasons  I love this cartridge. It has a little of all the seasons and the images are to die for! The other Cartridge is by Close to My Heart and is called Artiste All you have to do is click the links I provided to purchase the cartridges! Now how easy is that :) Yes I am going to Enable you :))
The tag is from the Artiste cartridge and I cut it at 4 inches. The Happy Birthday is from the same cartridge and is cut at 1.25 inches. I used dark brown ink to outline the tag and added Star Dust stickles to the colored happy Birthday to give it a shimmer.
Now on to Enjoy the Seasons  The fall leaf sprigs were cut at 1.50 inches and I cut 3 of them. The tree was cut at 4 inches and last but not least the squirrel on the stump was cut at 1.50 inches.
I used 2 sprigs around the tree trunk and the squirrel then to tie it all together I used a sprig in the upper right hand corner. It helped to keep it balanced and I liked it there. There is a beautiful large scalloped lace on the card that is hard to see and it is websters pages trim then I used the reddish pink lace for the bow to give it a little pop!
Thank-you for visiting my blog and I love comments:))
Now head back over to My Cricut Craft Room to see all the fabulous projects from my very talented Design team sisters!!!
For all things Cricut and more please visit Erica's store and here is that link..She has a sale going on. Yes I am enabling again:)

My Cricut Craft Room

I am back :) Here are a few cards that I recently made

After a very long break from blogger due to my blog being a mess when my blog designer quit hosting the blog design. I am back  With a be...