Monday, March 17, 2014

Crafty Happiness!

Hello fellow crafters :)
I have been trying to branch out of my crafting comfort zone and this is another one of my firsts.
I decided to make a shadow box of my favorite crafty embellishments.
 
 
Now for the life of me I could not get the yellow cast off of the photo. My lighting is bad in my apartment and the weather is not good for an outdoor pic.
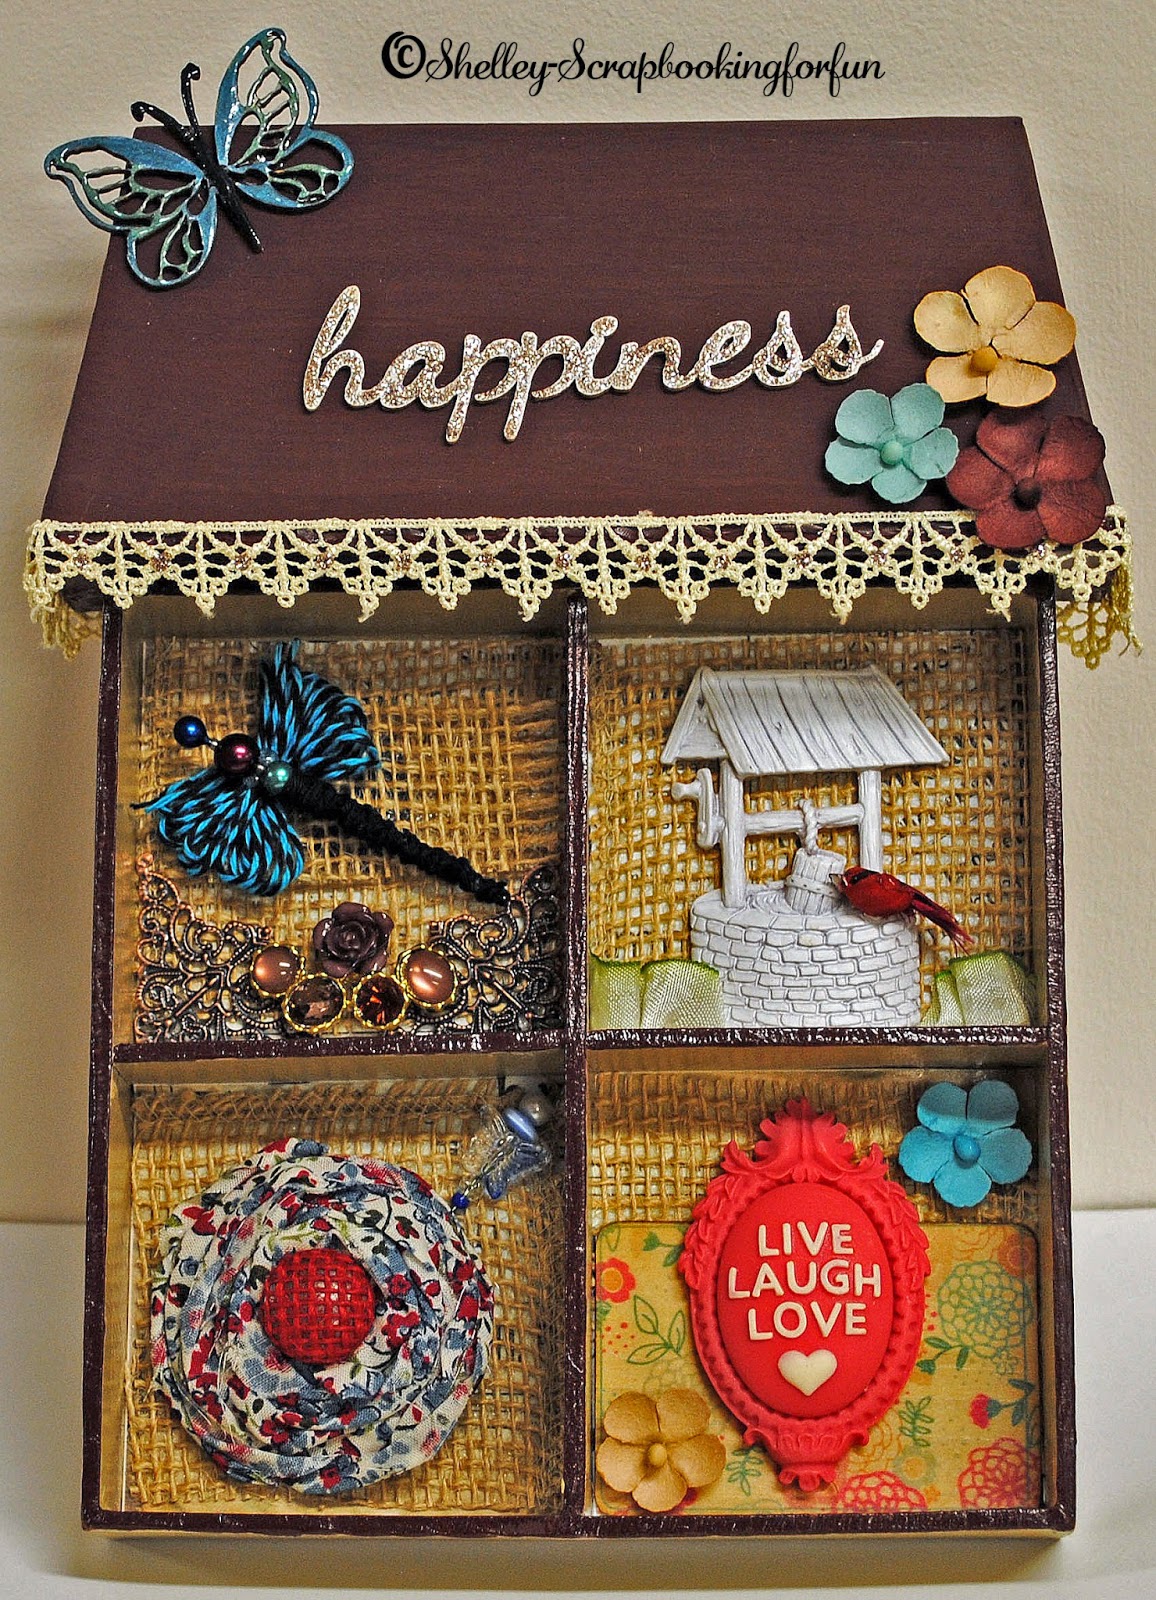
I started with a craft colored shadow box and painted it brown. I then used a prima cardstock and placed it in the back of the squares. I then used burlap and placed it over the cardstock.
Next in the upper left square I used 2 metal corners from Miriams Crafting supplies. I then took a beautiful Stick Pin from Pinque Peacock and turned it into a dragonfly using my favorite twine. (Trendy Twine). Now in the upper right square I used a wishing well from Prima. My grass is ribbon from 3 Girl JAM and the cute cardinal  is from a purchase from Blitzy.
The lower left is a beautiful bloom from Pinque Peacock. I then added a burlap button and butterfly pin and both are Pinque Peacock! The lower right is all prima and websters pages.
These are all things that make me happy:)
I love watching dragonflies, butterflies and birds. I love the old fashioned wells and have always wanted one. I love flowers of all kinds and Pinque Peacock is a joy to work with. The cameo holds my favorite saying. Now to get some of the beautiful flowers, buttons and stick pens head over to pinque peacock!!!!


Thursday, March 13, 2014

No Bunny Like You with Pinque Peacock

~~~~ Click HERE for the 300 Blog Follower Giveaway ~~~~

Hello to all of our Pretty Little Peacocks
Welcome to Pinque Peacock’s
MARCH BLOG HOP


We hope you will enjoy your time as you hop and that you feel
inspired to create after visiting the Talented Pinquettes' Blogs!
This hop will showcase projects that have been created using some of the
wonderful products that are always available at Pinque Peacock.

We are thrilled to have you joining us this month!

During this 3 day hop, you will see some past favorites, oldies but goodies, and get a glimpse of some NEW products as well! Feel free to browse the newly updated shop for amazing deals on tons of craft supplies and great handmade embellishments to use in all of your projects!

Our Monthly Hops are a great way to see the Pinque Peacock Products in action and to get your creative imaginations in "Full Speed Ahead" mode!

Our MARCH Release will focus on the theme of:
~*~ EASTER ~*~
in addition to MOTHER'S DAY!...
we can't forgot those mommies :)
All New Products will be added to the SHOP
for you to Purchase and start creating your very own
Masterpieces!!!

BE SURE TO WATCH
THE FACEBOOK PAGE


FOR SOME PRODUCT SHOWCASES, TOO

Are you Ready to See these products IN ACTION?

After hopping, we would LOVE for you to visit the

Now before we get to the prize and how you can win it here is a pic of my Easter Card!
 I decided to do a Easter easel card. I started with a robins egg blue card stock in standard 8.5 by11 and folded it in half. Then you fold the top in half again. I always lay the card back down after folding into the standard half fold to embellish. You want it to look good laying down as well as in the easel position. I then cut a scalloped oval in hot pink and embossed it. When you adhere the oval you want to only glue the lower half down so that it can pop up in the easel position. Next I did an Easter cut with my cameo of that adorable bunny. I used pop dots to fasten it to the oval. Next I used 2 wooden eggs that were put out by Prima a few years ago. I know all the stampers will cringe about this but I used Spectrum Noir markers to color the eggs then added some shimmer glitter and let that dry. After it dried I then gave the eggs a coat of modge podge and allowed that to air dry. I then used left over pieces of card stock to adhere to the back side of the eggs. The Spectrum Noir Markers are available at Pinque Peacock. All products from Pinque Peacock will be linked to the location on the Pinque Peacock Store Page for your shopping convenience :)
I also added 2 cute butterfly beads to the oval. Before attaching the eggs I made paper corners and attached those to the lower 2 corners. Now after the top was finished and dry I got to work on the inside. All the papers are from a doodlebug designs 6x6 pad called Hello Spring. I started the inside by attaching the paper just like it was a half fold card. The only difference is the greeting is at the bottom of the page instead of the standard top position. I then added the beautiful blue Fabric Splendid Swirl as an eye catching anchor to hold the easel in place. The adorable
 blue butterfly stick pin is also from Pinque Peacock. Well there is the low down on my Easter card:) Next you will be going to Julie's Blog
 
The full line up for all 3 days is at the end of this post!! Be sure to read the full post to see how to qualify for the post!!!!
!!!!Now, let's talk about the
BLOG HOP PRIZE!!!!
One winner, who has hopped all 3 days (Friday, Saturday, and Sunday) of our Pinque Peacock MARCH Product Release and followed the RULES BELOW will win

A $10 GIFT CERTIFICATE TO THE SHOP

Here is How*:

1 – Hop to ALL of the stops over the course of the 3 Day Hop and comment at each Pinquette Blog (Lineup for all 3 Days is below)


3 – Follow EACH of the Pinquettes’ Personal Blogs who are participating as Hop Stops this weekend.

4 - COMMENT at the Facebook Page telling us what you liked most about the 3 Day Hop

*You MUST do ALL of the steps above
to be included in the random drawing for the prize.
We would hate for you to lose out on winning just because you didn't follow these easy rules :(

The Hop will remain open until Wednesday, MARCH 19th, at 8:00 a.m. EST.
The random drawing will be held sometime during the week that follows and announced by Wednesday, MARCH 26th.

Now, if you find yourself Hopping off the Path on any of the three days, you can use this Lineup to get back on the Right Track . . .

DAY 1 (3/14/14):


*****

DAY 2 (3/15/14):

DAY 3 (3/16/14):
Thank You for hopping along and we hope you have Loads of Fun!
Peacock Love
and
Crafty Hugs
~ Jessica, The Quirky Queen
and
her BELOVED,
TALENTED, &
EXTRAORDINARY Pinquettes
~ ~ ~ ~ ~ ~ ~ ~ ~ ~ ~ ~ ~


Monday, March 3, 2014

Capture Joy

Capture Joy

Happy Tuesday everyone! Today I am posting for Pinque Peacock 
My project today is totally different for me and my first time doing a altered box.
I will be doing more though because it is a lot of fun!!! I started with a cute Heart Box from
I painted it with acrylic paint in a pretty fuchsia color then I stamped the hummingbird using a pearl acrylic paint instead of ink. I used the cute little capture joy stamp that came with the humming bird and stamped it in black ink. Now here is the pic and then we go into more details :)

Now you have a great view of the Pinque Peacock Pleated Petal, Cute Button, and of course that fabulous Pin!!!!! The beautiful metal corner is from Miriams Crafting Supplies and that Metal Heart that is layered onto the tip of the heart is from Pinque Peacock. The cream pearls are from my stash and the teal bling is my old friend Stickles Glitter Glue.
Thank-you for stopping in today and please stop in and say hi on my blog!!!!


I am back :) Here are a few cards that I recently made

After a very long break from blogger due to my blog being a mess when my blog designer quit hosting the blog design. I am back  With a be...