Wednesday, June 27, 2012

Would You Ever Guess Wednesday with My Cricut Craft Room

Hi everyone and welcome to Would you ever guess with my cricut craft room! I chose to go with the brads or eyelets option for my post :) If you own the ITop tool but could not get the punches did you know there is a cut on Walk in my Garden that works perfectly! Yes it is true! Even though I do own the punches I prefer the cricut cut!  So first here is a picture of the finished layout.


O.k pictured below is the I Top Tool  and the small I top brads.
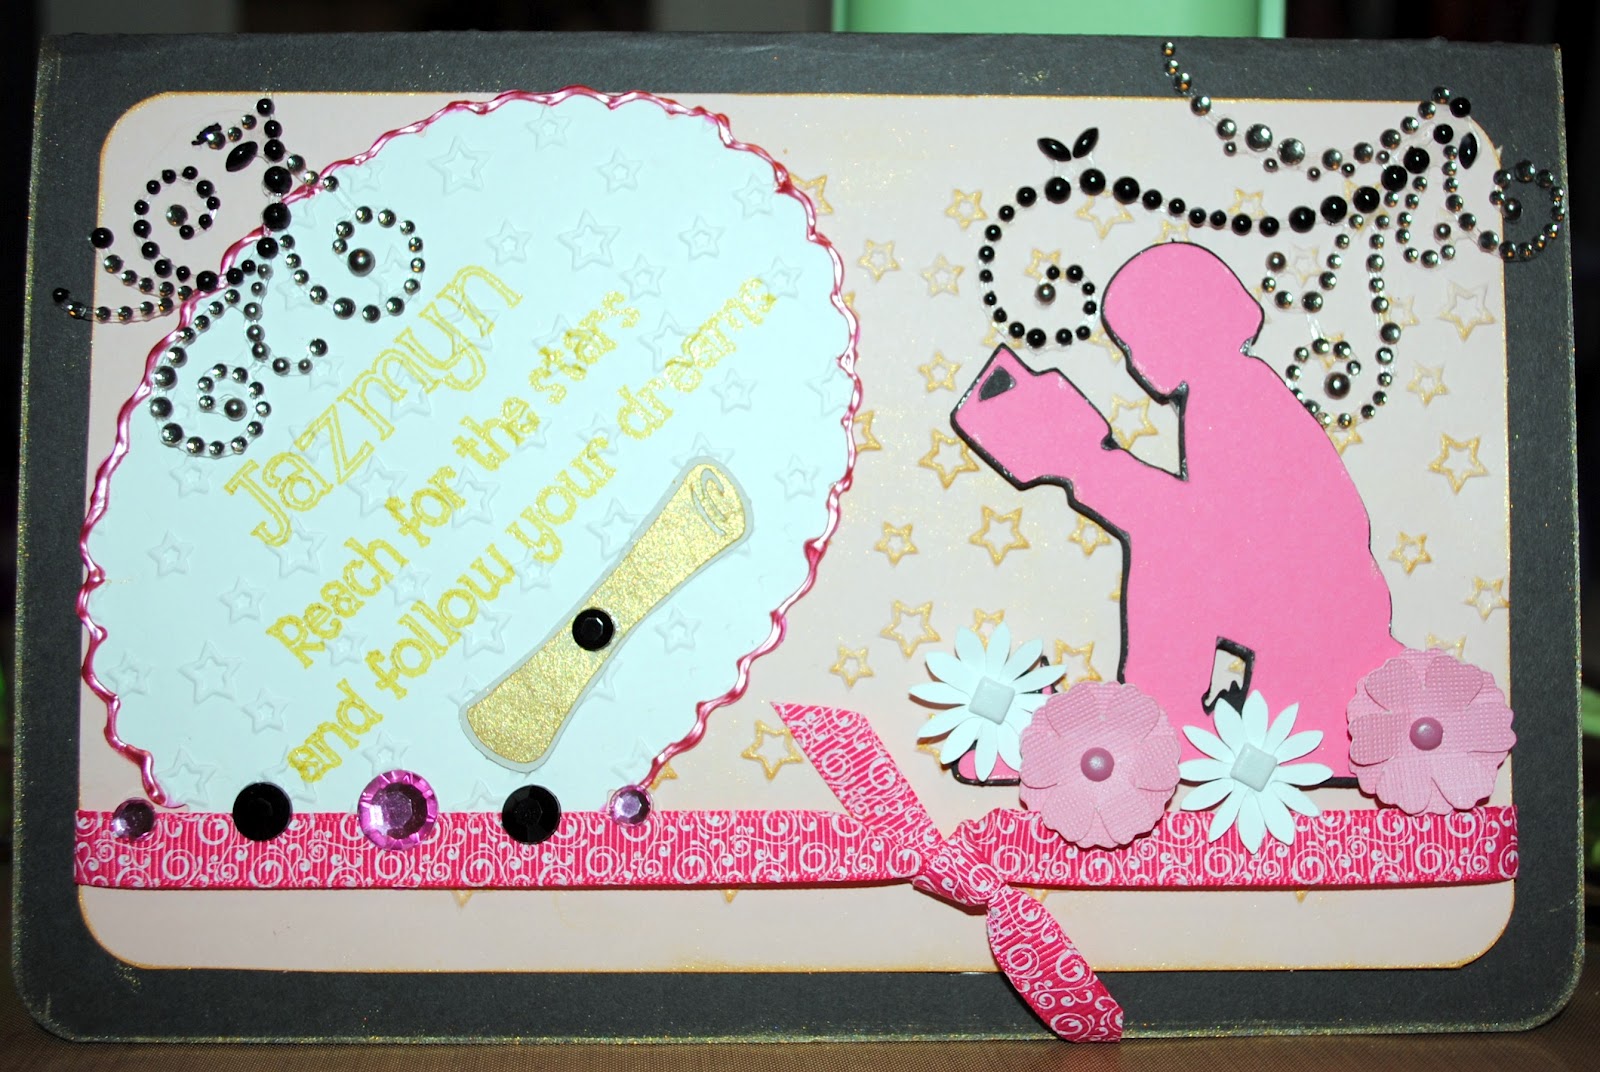
The cut that you see in the picture below is the daisy cut from walk in the garden. You will find that same flower on many cartridges. I did the cut at 1.25 inched. Then a trick I learned from Erica..run the cut through a sticker machine it keeps that in place perfectly while you are putting on the back of your brad. You can use that same cut in larger sizes for your larger brads. So if you can only afford the I top tool then go for it!! Here is a link to the tool in Erica's Store


I also used the same daisy cut at 2 inches to make my flowers. The cut is on page 85 of the Walk in my Garden Booklet. I then ran the flowers through my cuttlebug using the Swiss dots embossing folder. Here is the link to the folder in Erica's Store.


I then put a light coat of  3D Crystal Lacquer on the flowers to give them a light shine. I used stickles glitter glue on the brads and through out the layout to give it bling! Here is the link to the Stickles in Erica's store.

The crown cut is from Once Upon a Princess and was cut at 2.25 inches in the base and shadow cuts. That cut is on page 53 of your booklet.
Here is the link to the cartridge.

Then I used some bling from Erica and stickles on the crown. It wouldn't be a crown without the bling!!!
You can use Stickles and Liquid pearls on any paper or embellishment to give it dimension or a little glitz :)
Well that is my project in a nut shell. I hope you enjoyed it! I would love to hear from you so please leave a comment and if you are not a follower on my blog I would love to have you become one! If you have a blog I will follow you in return!! We crafty people need to support each other! Now to see some more projects from my Talented Design Team Sisters please go back to:
Have a fabulous crafty day!!
Shelley

Wednesday, June 20, 2012

Kaiser Craft Check In with Paper Patch Crafts

Welcome to another post with Paper Patch Crafts. This time I had the pleasure of working with The Kaiser Craft Line Check In. The line is available now at Paper Patch Crafts Store  Now let me show you my 2 creations with this line.

I love the way both of these projects turned out!The papers just looked vintage to me so I used some vintage photo ink on the edges of my journal to give it the look I was going for. Every paper and embellishment that you see on the journal is available right now In Annes Store.
The card is made from the same line on this one I did use a little torn paper look on the base to give it that old world feel. But once again you can purchase every item used in Annes Store and here is that link!! Paper Patch Crafts Store  you can also visit with us on Annes facebook page and here is that link.  Paper Patch Crafts Facebook page. You will also want to check out the other great projects from my 2 design team sisters and here are the links to their blogs:
Joanne's Blog
Shelley Toney


Hope you enjoyed a peek at her new lines and thank-you for visiting my blog!!
Have a great craft filled week!!
Shelley

Prima Doodle-Deux collection with Paper patch Crafts

Welcome! Thank-you for stopping by to look at the projects that I made using the Prima Doodle-deux line! This is a beautiful spring/ summer line and is available right now at


Every item that you see on these projects are available in Anne's store including the Websters Pages Lace the beautiful flowers, die cuts and embellishments! The wood embellishments are so much fun to work with :) Please be sure to check out the projects from my amazing Design Team Sisters and here are those links .Shelley Toney  http://heartstring-designs.blogspot.com


Please come and visit us on The Paper Patch Crafts Face Book Page! Here is that link!
I hope you have a wonderful Craft filled day!!!
Shelley


Monday, June 18, 2012

Card Creating Tuesday with My Cricut Craft Room


Welcome to another Card Creating Tuesday with
My Cricut Craft Room.
This week is all about kids birthdays!
On this card I used the following cartridges:
Once Upon a Princess, Birthday Bash, Lifes a party, Celebrations and Yummy.
Here is my card and I will give you all the details on these cuts as well as links to some of the great products that were used from Eric'a store! All the links will be in a different color from the post so you will just have to click and presto you will be in a paper crafters heaven!
 Birthday Girl is a cut from Once Upon A Princess and I did the cut at 2 inches in layers. You will find the cuts on page 34 of your booklet. The lady bug is from Birthday Bash and she was cut at 3 inches in 2 layers. You will find her on page 64 of your booklet. I did her face using Peachy Keen stamp set PK-495. Then added Stickles Glitter Glue to give a little bling. The crown cut is from Life's a Party and was cut at 1 inch in 2 layers and I used Stickles on the crown as will as some rhinestone stickers which Erica provided from her store. The balloons are from celebrations which is an older cartridge and I am sorry I don't have the book. But they were cut at 1.25 in shadow and in the standard cut. The twine is Doodle Twine in lilac. The ribbon I used is Bo Bunny. The cupcake is a cut from Cricut Imagine Yummy Cartridge and is on page 4 of your booklet. I did the cut at 3 inches in layers instead of as 1 piece. I also went in and changed the design on the cupcake wrapper. I do most of my projects in Craft Room because there are so many options available. It is a wonderful free tool. I think that wraps up this card. I tried to make it easy for you to find the products in Erica's Store by providing links to each product. Thank-you for stopping in and I love to hear from you so please leave me a comment!! 
Have a wonderful crafty day!!
Shelley


Be sure to go back to My Cricut craft Room to see all of the amazing projects that my Design Team Sisters have created!!
My Cricut Craft Room

Tuesday, June 12, 2012

My Cricut Craft Room Card Tuesday


Welcome to another Card Creating Tuesday with My Cricut Craft Room. This week we were asked to make a military card. My son in law is in the Marines and we send goodies and cards when he is deployed so I made a card to send to him  during his next deployment. So here is a picture of the card and then I will tell you how I made it!


On this card I used Stand and Salute to cut the following cuts:
The state cut in the back round was cut at 4 inches and then I embossed it with the stars. Land of the Free was cut at 2.25 inches and I did it again using the shadow feature.I used stickles glitter glue on the  white wording to give it a little sparkle.
The flags were a cut from the Cricut Imagine cartridge Enjoy the Seasons and I cut them at 2.25 inches. I added gold stickles glitter glue to the poles and diamond glitter glue to the stars to give it a little sparkle. The flower is a cut from Cricut Imagine More. I am an avid Craft Room user so in craft room I separated the layers and deleted the original wording on this tag and using the ad a text box feature added my own wording 1 line at a time. My wordings .2 in size and the cut itself is 3 inches. I used stickles glitter glue to outline the layers. The card stock and ribbon are from my stash :)
Thank-you for visiting my blog! I love to hear from you so please leave me a little blog love :) Now you should head back over to 
http://mycricutcraftroom.blogspot.com/ to see all of the amazing projects that my design team sisters have created!
For great buys on the latest projects here is a link to Erica's store.
http://www.shop.ericascraftroom.com/
If you would like a chance to join our fabulous design team Erica is adding a few new members and here in the link to get all of the information on the design team call.
http://mycricutcraftroom.blogspot.com/2012/05/design-team-call.html
 I hope you have a great crafty day :)
Shelley

Sunday, June 10, 2012

Travel Challenge Card for Paper Patch Crafts


Hi everyone! This card was created for a challenge for Paper Patch Crafts and is based off a sketch that was provided and the theme was travel. The beautiful papers and embellishments are available at Paper Patch Crafts and here is that link
Paper Patch Crafts Store


The products that I used from the store are:
Prima Natures Garden 6x6 Paper and the wooden buttons and ticket are from the same line. The pretty orange trim is Websters Pages. Yummy stuff to work with!! I love the wood embellies!!!


The Hot Air Balloon is a cut from Cricut cartridge Every Day Pop up Cards and was cut at 4 inches using the layering feature. The tag is a cut from Cricut Imagine Cartridge Enjoy the seasons. I did the tag in Cricut Craft room so I was able to change the colors and add the little saying on to the card. I am a cricut craft room lover!!!
The other products I used were Liquid Pearls in platinum and cantaloupe. The twine is Trendy Twine which is my favorite twine!! Here is a link to her store: Trendy Twine

Now here is the link to the challenge and below that will be a pic of the awesome prize!!! Paper Patch Crafts Challenges
Here is the pic of the prize :) This fabulous stamp set!!
 I love to here what all of you have to say so please leave me a comment and if you haven't joined my blog please do so I can keep you updated on all the new challenges and fun!!!
Have a great crafty day!!!
Shelley 
Now here are all of the Important Links Again:
Paper Patch Crafts Challenge
Paper Patch Crafts Store
Trendy Twine

Wednesday, June 6, 2012

Paper Patch Crafts Design Team Post


These projects were created with Yummy Websters Pages Trim, Prima Almanac 6x6 paper stack and Prima Nature Garden embellishments. I love colorful and beautiful trims and Websters Pages fits that bill just look at the rich colors in the lace on the cards above. The Prima papers in the Almanac Line have a vintage look to them and make the perfect back drop for your vintage projects. The nature garden flowers, wood embellishments and resins are outstanding!! I loved working with the rein bench pictured in card #2 and the wood buttons and tickets are just beautiful. Here is a link to Anne's store where you can find these fabulous lines!!  Paper Patch Crafts  Come join us on facebook too!! Anne always has a challenge going on! Here is the facebook group link Paper Patch Crafts On Facebook Be sure to check out the other projects made with these fabulous lines on my Design team sisters blogs and here are those links:


Both of these ladies are very talented and you won't want to 
miss the amazing projects they created with these lines!!!


Have a great Crafty day!!!

Shelley

Monday, June 4, 2012

Card Creating Tuesday with My Cricut Craft Room


Welcome to Card Creating Tuesday. This week it is Graduation Cards. On my card I used, A Child's Year, Paper Lace, Flower Shoppe and Graduation. Here is the Pic of my card.


For the Girl holding the book I used A Child's Year and the cut is at 3 inches I did the same cut using the shadow feature.
The flowers are 1 inch cuts from the Flower Shoppe Cartridge.
The scalloped oval is from Paper Lace and was cut at 4 inches. On this project I left the oval on my mat and using Craft Room I added lettering from Plantin School Book using the Chomas Gel Pen Holder and a gold gel pen.I have to say that it is a wonderful easy way to add perfectly formed lettering to your projects and so easy. The lettering was set at 1/2 inch. You can purchase the Chomas adjustable gel pen holder from Erica's Store. She also has a huge selection of Cricut Cartridges at really reasonable prices. The ribbon was also purchased from Erica. The rhinestones are Bo Bunny and the Flourish is Prima. The scroll was cut at 1 inch in the regular cut and the shadow cut. I used a gold shimmer ink pad to ink the scroll. I used a star embossing folder to emboss my back round and then carefully ran the gold ink pad over the embossing to create the gold stars. I outlined the oval with Perfect Pearls Petal Pink which are also available in Erica's Store. I know this isn't what people would normally think of as a graduation card but it will fit the outstanding young lady I made it for. I hope you enjoyed seeing my card! Please leave a comment I love hearing what you have to say. Don't forget to head back to My Cricut Craft Room to see all of the other great projects from my design team sisters!!
Have a great crafty day:)
Shelley
Be sure to check out Erica's Room on Facebook and the challenge blog for great ways to win awesome products!!

Saturday, June 2, 2012


Welcome to another My Cricut Craft Room 100 cartridge blog hop!!! You should have come from: Yvettes Blog and here is that link: http://gammascreativecorner.blogspot.com
For my project this month I used Create a Critter and Lori's Garden.
So here is the picture of my card:


My little panda is from the create a critter cartridge and is on page 58 in your booklet. I cut it at 4 inches and used the layering feature. Then I used Liquid Pearls to out line him a little bit. The tag is from Lori's garden and I did the design in Craft Room and removed the Thank-you from the tag and added in Happy Birthday. Cricut Craft room is an amazing tool to use. I love it! The butterfly  and little flower that the Panda is holding are both from Lori's garden. I also made the flowers. You can use any round scalloped cut to make them. Each one is 4 layers going down 1/4 inch with each layer. They are made the same way as my carnation on my previous post.
The beautiful fiberous cream paper with the shimmer is from Erica's Store so is the pretty green twine. I used a gel pen to do the faux stitching around the edges of the cream paper. I also inked the edges of the card stock with a Brillance Cosmic Copper ink pad that Erica had sent to me. I have to say it is my favorite ink pad and I will be purchasing some of those in the future!
Thank-you for hopping along with us! Be sure to check out Erica's Store for all the latest products and fabulous prices!! Next you should be going to:
Sheila's Blog and here is that link: http://2pawprints.blogspot.com
I love to hear what you have to say about my projects so please leave a comment and have a fabulous crafty day!
Shelley


Here is the full line up for today in case you got lost along the way.

I am back :) Here are a few cards that I recently made

After a very long break from blogger due to my blog being a mess when my blog designer quit hosting the blog design. I am back  With a be...